Wednesday 25 June 2008

Brief intro into Photojournalism

I guess you've gathered that this blog really doesn't have much structure (after all I've written part 2 of flash work, and still haven't created images to illustrate part 1 yet, which is why it isn't out). I now jump to the topic of photojournalism, an area where I'm rather active with.

The joy of being involved in a part-time journalism/photojournalism role is that the burden of deadlines isn't always looming. I've been exposed to this field for the last two years and it has been a good experience, assisting my self-development in photography.

However a distinction should be made between being a photographer and a photojournalist. The difference is subtle, but distinguishable. Let's use a parallel in terms of grammar. A photographer looks for shapes, textures, colour, the subject – essentially the capturing of nouns. The photojournalist looks to capture actions, a story – verbs. And this difference between nouns and verbs is that subtle feature between the two.

Capturing verbs isn't easy; some moments are spontaneous and could be missed if under- or unprepared. This of course adds to the pressure on delivering images that the editors can use for their stories. So what can be done to increase the chance of capturing these brief moments and also a narrative? I guess it comes back to one of my basic philosophies (and it was heavily repeated in the past post on Weddings): preparation.

Preparation here has to be meticulous if the event is of high significance. Let's take a protest as an example. The location has to be sourced and if there's going to be a march, then the planned route should be researched and then scouted for potentially good viewpoints. As with outdoor events, the weather will play a factor, and so the forecast should be looked up and that may determine what gear could be in your kit bag. Other things to consider is police presence. Major protests will of course have police presence, and if you're aiming to cover the events for publication then seeking a press pass will assist greatly. On early arrival for the event, make your presence known to the police and see if they have any pointers on potential spots for trouble – this could provide further opportunities for images.

The last part is liasing with the writer of the story (unless it happens to be yourself as well). If there is a particular take on the story, this may influence what types of images the editors might want to fit in with the writing. However this doesn't mean that the photographs have to all fit this particular angle. There may be an image that you capture that opens an entirely new direction for the article.

Once the images are captured, they then need a short descriptive line, known as a cutline. This essentially can be structured as follows:

[noun] [verb] [direct object] during [event] at [venue] in [city/ geographical location] on [day of the week], [date], [month], [year]. Reason for why or how this happened.

The images once captioned are either fed through an FTP, emailed or dropped into the office. Very little editing is ever done to the images (for the fear of misrepresention). The turn round time here varies from publication to publication from hours to days.

And there we have a glimpse into photojournalism.

Monday 16 June 2008

The tilted perspective

Hi again. It's been a while since I've written an entry into this blog. The subject matter today stems from a thread I created at the CameraLabs.com forum (see here). The question was asked how I figured out how much to angle the camera if I were to look for alternative angles to view a scene. I'll take the example of my image of Covent Garden. You can see a straightened and rotated version below. It's still a pretty image, but unimaginative. The two bannisters and the glass roof do pull the eyes into the frame, but none of those lines are particularly emphatic. We can optimise these lines by an alternative viewpoint - tilting.


Here is the same image again from a tilted perspective.

Now those leading lines are all in a different configuration. The two bannisters still pull the eye towards the distance, but now we have the asymmetry that also is pulling on the eye. The brown brickwork and the glass roof make the top half a very contrasting part of the frame. I used this to create a powerful line because of this contrast - the eye is more taken by the glass roof which leads to the distance. The bottom left of the frame is aligned with the bannister to create a second line. To top it off the degree of tilt was determined by aligning the transistion at the top between the glass and the brickwork so that it formed a vertical line downwards. What this does is create an impression that the market hall could be longer than it is in real life because of the exaggerated lines. Now one example isn't enough, so here's another:


This was taken very recently - it was a protest at the removal of hospital accommodation with junior doctors' training packages. The composition here again uses the tilted perspective, and here let me describe how I thought this one out. The natural lighting and made it obvious that the central girl in the white coat was an ideal focus. I asked the placard on the right edge of the frame to be tilted towards the camera to create a leading line into the centre of the frame and to balance the placard on the opposite of the central girl. So instead of a simple portrait orientation the tilt was used so that her height disadvantage with the man to her left was marginally concealed. The framing with her legs in the bottom left makes her legs look longer in combination with the distortion profile of a wide angled lens. It also adds a new line that leads to the centre of the frame.

So the theme I hope I've established is that the tilt isn't something that can be haphazardly used. You need at least 2 leading lines, if not more, for this perspective to work strongly. It's preferable to have the centre of the frame as the point where these lines converge, though it doesn't have to be the case from time to time. Again I'll illustrate this.


Here is an image of St Pancras Railway Station. The leading lines from the bannister and roof are similar to the one above from Covent Garden but the tilt here is noticeably less and also to the other direction. You might be asking why - and that's down to the odd leading line of the escalator. This doesn't lead to the centre of the frame, but to the bottom third. What this can add is another line of interest to the image.

We've now identified what needs to be there for tilting - leading lines to a focal point. But how can we tell when is a good opportunity to tilt, and then how much to tilt it by?

The answer is simple - experience and interest. We view the world from a horizontal perspective; as photographers we seek different perspectives - hence the suggestions of lying low or climbing high for that difference from eye level. What we sometimes neglect is that at eye level we can also tilt for that difference. Composition doesn't have to follow the basic rule of thirds as we're manipulating converging lines instead. And it's the convergence that tells us the tilt. Strongly convergent lines like the market hall can give greater scope for tilting, whilst gentler lines as in the railway station accommodate for less.

In the end it comes down to experimentation. Often a little trial and error to find the right angle is needed, and to find that different perspective that we don't often see every day. Good luck!

Thursday 12 June 2008

Tripods

Sorry for a few days without action; I've been busy with assignments, but that's no excuse for briefly abandoning you. Today I'd like to run through the tripod.

The tripod is a fundamental tool in the photographer's armoury. Used wisely, it can achieve fantastic images, and used inappropriately, it becomes restrictive. Let's go through the basics to a tripod, and then have a review over the tripod that I use - the Manfrotto 055xProB.

A tripod can cost next to little and also a fortune, and for most part, it's hard to justify spending a lot of money on a tripod unless you take it very seriously. Regardless of price though, one fundamental criteria exists:

How sturdy is this tripod?

The amount of stability you need will depend on the weight of the camera that you plan to pair the tripod with, so the heavier your gear, the more sturdy your tripod should be.

Secondary things to look out for are release plates, leg mechanisms, material and weight. Let's go through each in turn.

A release plate is a detachable attachment on the head of the tripod that allow your camera to be removed from the tripod without the need to screw or unscrew it. This is very handy if you plan to work both handheld and with a tripod.

Leg mechanisms - twist systems or thumb locks are the two common mechanisms found. Twist systems are faster to operate, but generally more expensive because of the extra engineering involved in the manufacturing process.

Materials and weight - both are inherently linked, and lightweight materials such as carbon fibre will cost more, but being a rigid material, will retain the sturdiness. Benefits of having a lighter tripod will be obvious when needing to carry one for a long time. Slightly heavier materials such as magnesium and aluminium are used in quality tripods to give a good compromise on weight, rigidity and cost. The heavier weight may mean more effort needed on carrying such a tripod on hikes, but will be less an issue if it's going to stay in a studio, or will be used on occasions.

The more expensive tripods come as legs only, and a separate tripod head has to be purchased. Although this adds more to the cost, it actually offers more flexibility. There are different styles of tripod heads that will be suited better to different photography styles. I'll list 3 major types -

The three-way head: the classical head and offers an all-round performance with the ability to rotate, tilt side-to-side and up-and-down.

The ball head: essentially a ball and socket mechanism that allows for fast adjustments of the camera, and therefore a very useful head for action photography, especially panning.

The panning head: This is a head that has fine tuned rotatory action and calibration for taking panoramic pictures. The handle on these heads tend to be longer than a three-way head.

Now onto some basic uses of tripods:

1) Night time photography - a tripod will hold the camera stationary and will allow for long exposure times, such as the light trails from traffic. Now with this example there was a technical difficulty with getting an exposure time so that trails were visible, but the advertising boards in the background wouldn't be overexposured. A simple trick was used to prevent this - a piece of black card was held after a second of exposure time across the top of the lens so that the boards wouldn't be overexposed. The traffic trails were captured over 4 seconds.


2) Landscapes - a tripod will slow down working with a camera, but with landscapes this can give time to settle down, think of composition and alignment of horizons before an image is taken. With deep depth of field, a small aperture is used, such as f22. This generally means a longer exposure time, and the tripod will be able to hold the camera steady.


3) Studio work - a tripod can be used to keep the camera stationary and fixed, so in a studio photoshoot where multiple takes may be required, this offers consistency. Of special importance is macro work and focus stacking (the overlaying of images with different depth of field control to produce one image with immense depth of field). Sadly I have no examples of this to hand.


Regarding my tripods of choice, the Manfrotto 055xProB is used in my macro and night photography because of the stability it offers. I pair it up with a separate head - the 804RC, which is a low end three-way head that does a very good job. However it is cumbersome to carry for long periods of time, and so I have a more portable Manfrotto MN785B Modo Maxi that supports upto 1kg. This tripod is less stable, so it isn't as useful for night and macro photography. I use it more often in landscape photography where a light tripod is needed for hiking.

I guess the difference between the casual and the seasoned photographer when using a tripod is the knowing when to use one, which means the planning ahead on bringing one. The appropriate use of a tripod - regardless of price point - will generally yield better results by eliminating camera shake.

And there we have a basic run through tripods, and a little on when to use them.

A week on...

Dear all,

Thank you for reading my ramblings this week. If there are specific questions you want answered, topics that I've not yet covered, suggestions for improvement, or anything in general - please leave a comment.

Regards,

Ed

Model releases

We've briefly covered an aspect of directing, which leads me onto this next topic - the model release.

I'll speak from the UK perspective, as respective laws in different countries vary. On my travels I adopt the "I'll get a model release form signed if in doubt" approach.

In the UK it's not a legal requirement to have signed release forms. For example if you are hired to take images for a wedding, modelling portfolio or for a portraiture session, it's advisable to have the terms agreed to prior to payment. The photographs belong to the photographer with the UK law, who has the right to do anything, from publishing them without recompense for the model.

Street photography and candids are again images that belong to the photographer. However it is courteous behaviour to either seek permission to take an image, or to take the image then let the subject know what you've taken, and if they object. Private property is treated the same as a person, and consent ought to be sought prior to photography.

For photojournalism, this same approach applies - if you're capturing people at an event, let's say something sporting, or a speech, there will be prior agreement for your presence to photograph from the publication you're working for or if freelancing, by calling up the organisers in advance. But those photos from the event are yours unless the organisers impose restrictive conditions for photography, such as all images are restricted to being published only in the publication you work under, or have agreed to work for and cannot be sold for profit.

Therefore the model release form might appear to be rather limited in scope (and photographers are less likely to be sued and are sadly now more likely to be stopped by police in public - a topic that will deserve a post of its own). However I should cite areas where its use could be useful.

If you're taking images of children, seek prior permission with the parent(s) or guardian and have a model release formed signed. And if images are going to be submitted for stock photography, many sites now require written release documentation for their own protection.

As mentioned, laws are different from country to country, and so I use release forms whenever in doubt. The one I now use is from Getty Images. You can find a brief overview on how the release form works as well as collection of release forms in different languages from the link below.

http://contributors.gettyimages.com/article.asp?article_id=991

Wednesday 11 June 2008

Amendment on Renting equipment

I've noticed that my previous post on equipment rental was focused around one particular situation of use - the rare to occasional. If you find you need the lens more often than expected and the cost can be offset over all the times you use it for assignments, then it may work out better to purchase than rent. However rental is a useful way to test equipment in the real world rather than at stores to give a feel for how worthwhile an investment may be, whether it be a camera body, lens, light meter, or lighting equipment.

Tuesday 10 June 2008

What less common things can you find in my bag?

I know there are photographers who are interested in what's in professional camera bags when on assignments. I won't go into what I carry in this post (I'll save that for another time), but here we'll look at 5 things that aren't immediately obvious, but could be found accompanying a professional. And I've cheated a little with the title - some of these items can't fit into a bag, and are found stored in a car boot, or somewhere convenient on location.

1: White bounce cards - these can be made of card or thick paper. I use 3 x 5" index cards. They are very useful to diffuse light by bouncing when there are high ceilings, or a non-neutral colour on the walls. They double up as a means of calibrating custom white balance.

2: White hand towel - two purposes (like most items in this list...): one is as a towel - to wipe off sweat during the pressures of an assignment, secondly it can be used as a reflector outdoors, especially with grass. Grass reflects a horrid green glow, and simply laying the white towel in front of your subject can reduce this glow and also lift some shadow.

3: Step-ladder - useful for group events, such as weddings or parties. Combined with a wide angle lens this gives a higher perspective. It can double up in portraiture work where a high perspective can be taken; it can be very flattering for a model to look upwards towards a camera as it can hide the body and pull in more of the jaw line.

4: White umbrellas - have a few white umbrellas and if it rains for yourself and your subjects. The white material doubles up as reflectors and lifts shadows. In sunnier conditions they can be used as reflectors in their own right, and indoors they can be opened up and used as a surface to bounce light from. For the more meticulous, having all umbrellas the same also makes for a more professional image.

5: Tape - useful in studio work to mark out positions for lighting, or where models can position themselves.

Sunday 8 June 2008

Renting equipment

Of course owning your own equipment is far more satisfying, but don't discount the possibility of equipment rental as a waste of money. Rental is a very clever way of not tying up finances on kit that won't be used day-to-day. I'll illustrate this point.

Let's assume I cover three sporting events a year, and for those I need a fast telephoto lens, say a 300mm f/2.8. A rounded UK cost of a Nikkor version of this lens is £3000 (US $5800). So for each time I use the lens it will cost £1000 (US $1960). This is a heavy price to pay for an occasional use lens, so instead of tying up capital that could be used for other things, rental becomes an option. Renting the 300mm f/2.8 is approximately £50 per day (US $98) and £200 per week (US $392).

Therefore rental of this lens for 3 days of sporting events will be £150 (US $294). This is far less than the £3000 (US $5800) that would have been paid if the lens had been bought.

Other than the lower price there are also other factors to consider. A 300mm f/2.8 isn't cheap to insure - rented equipment will be covered for most incidents under your rental. The lenses will also be regularly serviced to make sure they are in top condition.

A further point would be on travels - on location you might not be able to carry such a large lens onto aircraft, or it would be logistically impractical. Rental once you're at location is an easy way to ensure no equipment gets damaged in transit, and that you won't need to pay extra to carry overweight handluggage (lenses and other camera equipment should never be checked in so keep it with you).

However it isn't all that rosy - it is common that a substantial deposit is left or for credit card details to be retained so that the rental company has a guarantee that the lens gets returned, and there are usually fines for late returns.

And there we have it. That's a brief overview on some reasons why professionals consider renting equipment.

EDIT - please see the amendment dated 11 June 2008.

Workflow - from camera to working image

I've been asked to run through workflow. As I've been accustomed to working to deadlines for assignments and clients, the ability to minimise workflow is vastly beneficial. So here's a brief insight into how you could be minimising your workflow.

The underlying principle is very simple: be able to get an image off the camera with the correct colour - process it if necessary (but not for photojournalism) - get the image out, get paid and move onto the next assignment/project.

So let's take each step in turn. First we have to get the image off the camera. A fast card reader and also a set of fast memory cards will be very useful. I'm not terribly brand loyal when it comes to cards, and have a collection of high speed cards from Lexar and Sandisk. I find it best to transfer all files to a folder named after the assignment on my desktop as my working folder.

This is the beginning of getting the images out. The next part is making sure I know where my images will be going - if it's for print, then I need to select the paper, the printer and the size I will be printing prior to any processing. Why? Because I can adjust my colourspace to accommodate for the final results. Colour management is very important in the workflow process and shouldn't be neglected. I select the correct profiles for the work and begin processing. This may simply be resizing the image to some more advanced work. But here's the trick to reduce workflow - get the image right in-camera. This really does cut down the amount of work needed, and images can roll off as straight RAW to TIFF conversions with a watermark action in Photoshop if need be.

Now I've alluded that I don't process for photojournalism - and this is a strict code I adhere to. Yes, digital photography should embrace the editing element, after all, that's one reason why it's become so popular over film - but for journalism you simply cannot take the risk of publishing an image that may have been falsified. Therefore publications and editors I've worked for would like the images as shot. This again means that getting the right image in-camera is vital.

Processing should deserve a few posts with examples, so I won't go into detail suffice to say that this is usually where most time is lost in workflow. Therefore I do the following before each assignment:

-clean the sensor and test for dust spots with the aperture closed as far as it goes over a brightly lit piece of white paper
-make sure I have a grey/white card with me if I'm covering indoor events so I can customise a WB. Outdoors I will use auto WB as lighting will change, but indoors, lighting tends to stay static.

If all images have a dust spot or the wrong white balance (WB), then every image needs to be recovered. And this is a pain for workflow. Imagine that each image takes an extra 5 minutes to correct - that's an hour lost for every 12 images. That one hour could be used to go and cover another assignment.

And that's really it from a simple summary. I'll make sure to go into more specific parts of this whole workflow process which one post can't possibly do justice. Again, if any questions arise, please leave a comment.

Friday 6 June 2008

Are you lost? Where's that sense of direction?

For seasoned photographers, people and portrait photography just becomes more familiar, less daunting. I can reflect back on the early part of my journey into photography and how daunting it was to have a person (or even persons) to try and organise AND to take a good image of. Direction and thinking about exposure, lighting, the background and depth of field...it just wasn't a good combination. My nervousness meant that I'd be focusing on one thing, and one thing only, so results were generally more miss than hit. Today's post will look at the basics behind how I deal with people and portraits. If there's something here that you don't feel is right, or could be improved on, drop me a comment. I enjoy being openminded and after all, photography is a subjective art form and there's something new to pick up. So, let's tackle directing an ordinary person or a model in front of your camera in a basic five point checklist.

1. Plan

Before a camera is even picked up at a photoshoot, plan. Plan, plan, plan! At the very beginning there is so much to consider and think about. A plan will help structure your photography so that you know what you are trying to achieve. Having that goal will make your life easier as you have a sense of direction - and being the director behind the camera, it would be mortifying if the director had no direction! The plan will be based on what the photoshoot is for. Is it for a client or for yourself? That will dictate the brief. If it's for a client, listen to what they want, and then plan around that. For example, if it's fashion then you have to consider what's being worn and what surroundings will fit in, and then consider portrait-orientated ideas in full length or 3/4 length. It's less likely for the camera to be in landscape-orientation for fashion. Other things to think of here would be what equipment to bring to achieve the goals you want, if you're shooting outdoors - what time of day would be best? This is important for lighting. And if it's indoors, what sources of light are you going to use? Window light, artifical light? Planning ahead will give you a sense of direction.

2. Build a rapport

This is where most photographers come unstuck. There's either no rapport or the person(s) you're taking images of are familiar to you that this is forgotten. You need to interact. Talking is a good way. Find out their interests - talk about what makes them feel comfortable. It's wise to read the newspaper or headlines on the internet on the morning of a job so you have topics to discuss. And once you start talking, keep talking. Even during the shoot, carry on your conversation with perhaps the odd interruption to tell them to lift their head or look a certain way. You might be asking me: "Why do all this?" Simple. A relaxed person in front of the camera makes for more genuine expressions and the time appears to fly faster. It can also be more engaging. Look at it from another way; which photographer would make you uneasy - someone who was fumbling around camera settings or unsure of how the lighting looked - or a talkative person who knew what they were doing? So try and relax your subject. I've heard of photographers who've used music to settle their models in studios. Anything goes - but aim to relax.

3. Avoid static postures


Once you have a working relationship, you need to be able to advise (or even control!) the person in front of the camera to get the right "look". I avoid the word "pose" - all will be explained shortly. Seasoned models will do it better than ordinary people, so let's assume we're dealing with ordinary people.
The likelihood if you ask someone to stand and "pose" is that they stand still and look straight into the lens, have a hand on their hip and pout, or have their hands in their pockets. All very well, but they're cliche and not dynamic. In the business this is what we call "static". There are times were a static posture will work, but on the whole, they lack a bit of magic.

4. Be dynamic


This is the opposite of static. Essentially the term "dynamic" is tagged to postures that are mid-movement. Here's an illustration on the left (click for larger). This was a charity "fashion show" and the models were all ordinary people who were doing it for fun. Too many were like the girl on the left. Walking and looking at where their feet were next going to land. As you can imagine, that doesn't make for pretty pictures. Being close to one side of the runway, I got interacting. Now I can't remember what I said to the pretty girl in the pink satin, but she took notice, strode towards me, looked into my lens and smiled. So the way she appears in this image could be called dynamic as she is visibly mid-stride, and you can picture her swinging her arms with her left foot moving forward.

Now in a more likely situation that you find that you need to get your subject dynamic, you can use this simple technique. Get them to stand one shoulder slightly forward, and turn their head and look towards your lens. Simple, yet dynamic.


5. Know how to flatter with the camera

Directing is all about making your subject look good. This means you should know your body and face types. There are certain ways to make people look better. With a never-ending list, here are some starting points to think about.

-Let's take the above idea of shoulder forward for dynamism. It will also make the body look slimmer, and is useful with subjects of heavy build.
-If you're taking an image with more than one person, and one is significantly shorter, get him/her to stand one step closer to your lens than the others. By simple perspective (aka compression) you will be able to iron out a little of the imbalance.
-Don't take portraits from a low viewpoint (unless for a specific creative purpose). You will capture the openings of the nostrils, which aren't flattering.
-If a person has a large nose, then avoid profile photos...as I've said, this list could go on. Maybe it'll be a topic for the future.


Hopefully with these 5 basic pointers, you've got a little more direction on how to manage people on a photoshoot. But to fully appreciate good direction, why not let yourself be the subject? Let someone else be behind the camera and take the other perspective. It can open up ideas on how you could communicate ideas across to your subjects in the future.

Until next time.

Thursday 5 June 2008

Flash work - part 2: off-camera flash

Okay, I'm writing this out-of-sequence. This will be the second part in a series on how to use flash more effectively in your photography. We'll be looking at off-camera flash. Why is off-camera flash "better" than being on-camera? The answer will become apparent here.


I use a Nikon system, primarily because of the Creative Lighting System (CLS) that they offer. Being able to trigger flashguns wirelessly off-camera is a valuable tool. The alternative to using a wireless system is through a sync cable, which is what I've done here for this tutorial. I've also included the use of one of my more commonly used flash brackets - the Custom Brackets CB Mini-RC (illustrated on the left). I'll talk a little more about this bit of kit later on.


Before we begin off-camera flash work, let's quickly review four on-camera methods as our reference points.

All images were taken handheld with a D200 with a Nikon Speedlight, Auto white balance, 1/60, f/5.6, iTTL mode, 0 comp, with Auto FP High Speed Sync on.

1. Direct flash. Pointing the flash at the subject is the most simple way that flash can be used.

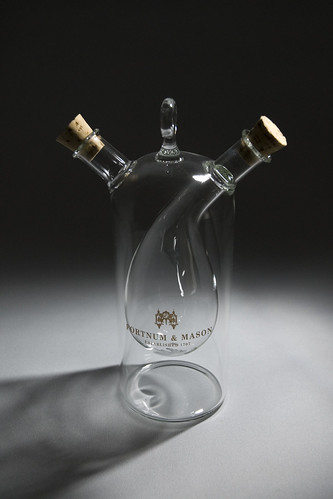
As you can see there is a harsh shadow floating behind the cruet. The flash was sitting directly on the flash hotshoe, and therefore the shadow is cast towards the far right once the camera is turned to a portrait orientation.


2. Bounce at 45 degrees. The flashgun head is tilted at an angle of 45 degrees from the plane of the lens, and so light is not pointed at the subject.

This time you can see that the shadow is a little less harsh, and light is visible in the top left of the frame. Again this is because of the flashgun sitting directly on the top of the hotshoe on the camera. We'll try one more bounce, but to get rid of that uneven light distribution, I'll be using a rubber band a white index card.


3. Bounce at 60 degrees and a classic index bounce card.


There's a difference here. The card was placed on the top of the flash head, so that when in portrait orientation, it will push light back towards the right. And we can see evidence of that here. The balance of the light is still not perfect, but where the light is falling on the white background is more to the right and away from the top left corner than in the previous example. The light is also more evenly pushed and the image is brighter. And we've got a soft shadow...


4. Direct flash and Stofen Omnibounce.

The Omnibounce is a popular diffuser amongst photojournalists because it's compact, and is effective. It is recommended that you bounce using the Omnibounce, but here I've decided to use it direct so you can compare it with the direct flash (smaller pic below as a reminder), you can see that the shadow is softer with the diffuser. The image is also brighter as light is being spread out more.


Now that we have our references, let's see what I can conjure up with the flash on a sync cord.

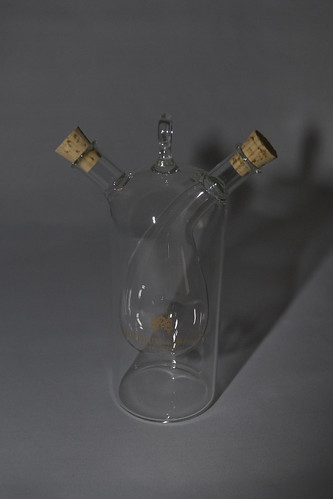
5. Off-camera: Flashgun to left of camera, lens height.

There's instantly a dramatic change in lighting. The flash is highlighting specific areas of the cruet that adds dynamism to the image. The shadow from the cruet gives us a clue that the flash is indeed on the left of the camera.


6. Off-camera: Flashgun to below camera right.

The last image was taken on the left at the height of the lens. I've now swapped the flash over to the right and instead on being the same height as the lens, it's now below.

So what are the differences? Well the cork stops are no longer highlighted by the flash and the shadow is harsher.


Let's try the same from above the lens height.


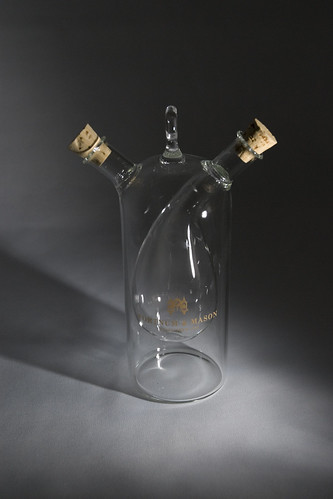
7. Off-camera: Flashgun to above camera right.

The cork stops are now well lit. Because the flash is aimed down, the light on the surface is more intense than the flash pointed up, as in example 6.


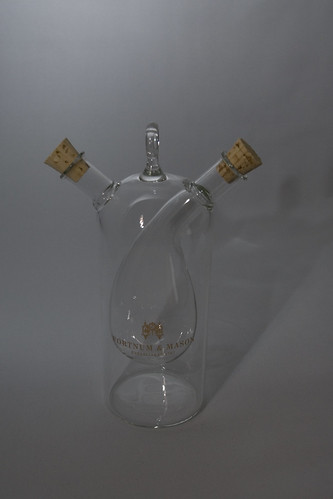
8. Off-camera: Flashgun directly below camera.


Rather than a flash on camera left or right, how about directly below? There's no point in directly above - that's where the hotshoe sits.

Because the flash is below and pointed slightly up and direct, there is no light cast on the surface (and therefore no shadow!) Instead it intensely lights the front of the cruet.


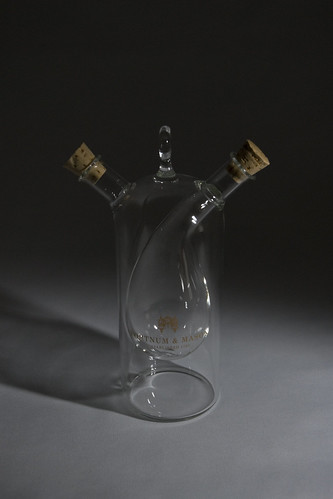
9. Off-camera: Flashgun front right camera.

One of my more favourite approaches though is to move the flash into an opposite direction to the camera. This illustrates a flashlight to the far right and in front of the camera. The shadow again gives us the clue that the light is indeed coming from that direction.


10. Off-camera: CB Mini-RC, direct flash.

The final example is with one of my off-camera brackets: the CB mini-RC. It's fantastic for portrait-orientated flash photography as it pushes the flashgun back above the lens, rather than being on one side if it were on the hotshoe.

With direct flash the shadow is now placed behind the cruet, rather than to one side.


This illustrates some common off-camera flash configurations, but when should a certain technique be used? That's a tricky question as it depends on your subject, what you want to highlight, and how your ambient light is. I'd neglect ambient light for the time being, and would rather discuss subject and highlights.

Let's take the cruet as our subject. If I wanted to highlight the logo printed on the front, then a standard direct flash wouldn't be useful as it will bring reflections. So what are the options? We can backlight as in 9, or have a very intense light from a direct flash below the camera. So these would be the options I'd limit myself to in order to highlight the logo.

Another example - we would like a soft shadow. That leaves us with bouncing, direct flash with off-camera bracket, the omnibounce or a direct flash below camera.

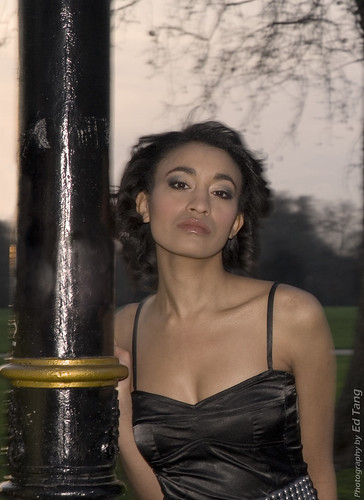
So if we think of a portrait, rather than the cruet, if we wanted a soft shadow, we can directly pinch ideas just mentioned. If we wanted to highlight the hair, then we can imagine that we're lighting the cruet's corks. So we could be looking for the flash to be placed higher and to one side, for instance.

And this is how I approach off-camera lighting.

Wednesday 4 June 2008

Planning: Wedding Photography

I'll be upfront and tell you that I don't cover many weddings. Why? Because it's hard hard work. And this post might illustrate the thought process from a semi-professional perspective, using DSLRs. Don't worry, most the ideas can be used with compacts and bridge cameras.

Equipment:

It is a must that you're sure to have enough memory cards to last the day; typically 5 to 10 2-4GB cards should be enough. Make sure you have a filing system for your cards so you know which ones have been used and which haven't. I place my cards in a card wallet face up if they are empty and reformatted. Once finished I place them face down so I know it's been used.

Charge all your batteries and have a spare. Bring your charger with you and once you have a dead battery, go charge the it whilst you're shooting with your spare.

Tip #2: Do clean your sensor and lenses beforehand. Elimating dust spots with the clone tool on all your photos will increase your post-processing workflow immensely - so make sure you're dust-free to make life easier.

Pack your lenses. A short telephoto, macro lens, normal zoom and an ultra-wide/fisheye. I'll go through ideas on these in a moment.

Lighting - a flashgun or two. If you have videoheads or a ring flash, take those too. A reflector will be handy. If you have white umbrellas bring those too. They can double up as a photographic aid or rain protection.

Tip #3: Pack your day bag. Keep it small. Carry 2 lenses inside at most and wear your camera out. Keep a bottle of water with you. The rest we'll leave to your most important sidekick...

Tip #4: Get yourself a female assistant (explanation coming up, and I'm not being sexist) -
she'll be able to go and check that the bride is decent to avoid any embarrassing situations in the build-up to the wedding. She will be your best friend for the whole day. Why? Because she makes the biggest difference. She's able to help he'll be able to go and check that the bride is decent to avoid any embarrassing situations. She can also help with organising people in group shots, hold a reflector, carry any remaining lenses, memory cards and tripod (if you planned to use one - it should be left in the car if you don't plan to use it, but there for a last minute change of heart).

Tip #5: Finally the magic things that amateurs forget/don't think of. Bring a step ladder with you and leave it in your car boot. This will be useful for group photos or to get a higher perspective with a wide lens. A camera cleaning kit in case of emergencies, such as confetti stuck to the lens... and spare shirts, because everyone sweats. And did I tell you it's hard work?

The plan:

If it is possible, do go and take some prep shots at a rehearsal. The mini-guide here is for inspiration. You don't have to follow it, but you will get an impression that I am trying to chart a narrative, which is the key to a great wedding album.

1: preparation details; follow the preparations and not the bride. She will appreciate the space and the images you capture she will likely not see during the day. Things to take are macro shots of the rings, photos of her shoes, the cake being decorated or the flowers being arranged...there are much much more. End the final part of this section with the bride. Get your assistant to check if she is suitable for a few photos whilst she is getting ready. Avoid the bulk of the make up session - just go and shoot when she's putting the lipstick and/or mascara on. Again this is to give the bride space. Have your assistant standing by to let you know when you should be there.

2: Bride's arrival: leave around 15 minutes earlier than the bride so you have time to set up. Leave more time if you think your inexperience will mean that you need more time to prepare and recompose yourself. Take photos of the groom's party whilst you're waiting and loiter around where the bridal car will arrive so you can capture her stepping out the car. Take a burst of 4-5 images and now run down the path towards the church door (assuming it's a church wedding). As soon as you get there, switch to a tele and capture a few shots of the bride walking to the church. Quickly get inside and get yourself up with a wide angle lens.

3: Church: bump up the ISO, and switch to manual control if confident, or aperture priority if not. Get near the choir at the front as that yields good angles most the time. If not, a clear view of the bride is a must. Things to look out here - get the exchange of rings, facial expressions in the congregation, the signing of the register (in the UK it's illegal to photograph this document so make sure when you do, make it plainly obvious that you are shooting below the level of the document and focus your camera on the hand and the pen). Finally avoid the vicar! Some will object to photography, but if you don't give them the chance to prevent you, all the better for you and the couple.

4: Post-Church ceremony: outdoor photos. Do not forget to lower your ISO! Too many rookies make this mistake. A fisheye or ultra-wide is effective here for group photos with interesting perspectives. Don't worry about distortion of the people on the edges - it all adds to the effect. Use your step ladder for a higher perspective. Keep things natural here, and avoid directing people around. Orchestrate them only if needed. Your assistant can help with a reflector or looking out for your next interesting group to photograph.

5: Reception: Let things flow. Capture candids here. Your venue will suit this best. Shoot the bride and groom first then the groups afterwards; lighting later on will gradually become unfavourable. Get your banked photos of the couple ASAP.

Tip #6: Avoid alcohol and keep to water and fruit juice. Unsteady hands will not help, and the alcohol may worsen the pressure of photography - it's likely that you are shooting for 10-14 hours on the trot. Flash will be necessary by the end of the reception. Check what the ceiling is made of befor bouncing - if it's not neutral coloured it can cast glows, such as orange from wood. Expose for highlights as shadows can be saved more easily.

6: The speeches - be prepared for the obvious things such as catching the groom winking to his best man, or photos of the parents and their reactions.

7: After the wedding: organise your photos so that they tell as story. A narrative makes the album that more special because it feels personalised and not just a collection of photos of the day.

Tip #7: Have fun.

This might be information overload, and I could still keep going on. Everyone has a different style of photography, and this is only one method, but one that is planned and prepared.

Tip #8: You should never cover a wedding unprepared.

Until next time, and if you have any questions, do post your queries.

The first entry...

How to start this blog? Perhaps it wise to begin with a little explanation about who I am and what the intent of this blog is for.

Very briefly, I'm a part-time photojournalist, freelancing for small publications. I do a little event work every now and then.

Now the internet is full of blogs and sites that go through the basics of photography. I'll try to be a little different. As well as some basics, I will be sharing some more advanced aspects of photography.

Comments, questions, feedback are all welcome. So let's begin this journey into photography.