I know there's not been much activity at all with my blog of late, and sadly there won't be much planned in the near future. I don't plan to delete this blog so that past posts can still be kept as resources.
I'm sorry; in the meanwhile, keep snapping away.
Tuesday, 13 January 2009
Tuesday, 14 October 2008
Exposures - what film taught us
I haven't been good at keeping this blog up-to-date. Recent conversations have brought up the subject of today's entry: what we used to do in the days of film to judge exposures. The rule was known as the "Sunny 16 rule", and is as follows:
f/16 for a sunny day
f/8 for overcast
f/4 for a setting sun
The shutter speed will be determined by the ISO of the film. So if we were using ISO 100, then we could be using 1/100 or 1/125. If we were to use ISO 400 then 1/400 or 1/500; it's essentially a reciprocal.
Even on a digital body that can account for the exposure, knowing the equivalent for manual exposures will help on the technical side of photography.
Saturday, 20 September 2008
Constructive tutorial (3) - Palakaboy
For today's entry, I've been kind enough to have been lent an image by Cameralabs Forum member, Palakaboy. It is another portrait, but unlike the one in the first tutorial we have a different set of issues. Here is his image:
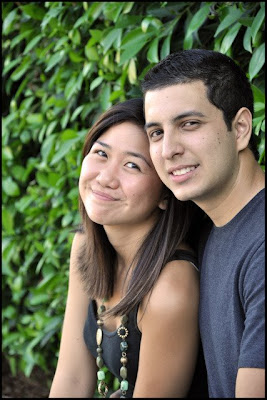
The composition is solid, as is the exposure. But what we lack here is dynamic lighting and a problematic background. The DoF is quite deep so we have leaves that are competing against the subjects, and as mentioned in my outdoor portraiture entry, green backgrounds close to subjects will act as green reflectors - we have that green cast on the midtones of the skin. Both these issues we can adjust with some knowledgeable post-processing - the issue with the lighting is harder, but we'll see what we can do. Here goes:
We can use techniques to blur out the background, but we don't want to blur out the subjects. To get around this we can duplicate the background layer and extract the subjects in a separate layer. Once extracted, this will allow us to manipulate the leaves separate to the subjects.
To alter the background, gaussian blur is needed, but a common error is to make it look very artificial by having a uniform flat blur. We can conceal the editing by duplicating the background layer again and gaussian blur the layer. Choose enough by looking at the preview and apply it. A layer mask is then added and we use the gradient tool to select where we want focus to be and have a gradually increasing blur away from the subjects to give a less static background blur.
The final part is to make the subjects look good in the light. Green casting can be removed by using coloured filters, selective colour, colour balance and curves. All four methods are shown in the video.
We can also make the subjects radiant - we duplicate the extracted layer and run a high pass filter. To know how much to run through, we guage by using the gaussian blur function - we identify how much we need just to make the skin look smooth but not too out-of-focus, and then we take this value for our high pass filter. After the high pass, we add a gaussian blur, but roughly only a third of what we applied for the high pass. In the video I used 1.5 for the high pass, and consequently 0.5 for the gaussian. We hit Ctrl+I to invert the layer and then choose Overlap as our blending style. This gives a radiant look on the subjects, and a handy technique in hand if you want to hide some skin blemishes. I chose Overlap to accentuate the effect, but we could have quite easily used Soft Light. Using the Soft Light blending style will give a more muted effect than Overlap.
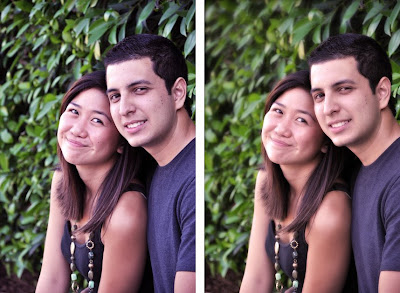
The end result we have is shown on the right with the original on the left (as always, click for larger images):
The hurriedly made video below goes through the above techniques (though I may re-record it at a later date):
I hope there are some useful processing techniques to take away, and thanks again to Palakaboy for letting us learn through his work.

The composition is solid, as is the exposure. But what we lack here is dynamic lighting and a problematic background. The DoF is quite deep so we have leaves that are competing against the subjects, and as mentioned in my outdoor portraiture entry, green backgrounds close to subjects will act as green reflectors - we have that green cast on the midtones of the skin. Both these issues we can adjust with some knowledgeable post-processing - the issue with the lighting is harder, but we'll see what we can do. Here goes:
We can use techniques to blur out the background, but we don't want to blur out the subjects. To get around this we can duplicate the background layer and extract the subjects in a separate layer. Once extracted, this will allow us to manipulate the leaves separate to the subjects.
To alter the background, gaussian blur is needed, but a common error is to make it look very artificial by having a uniform flat blur. We can conceal the editing by duplicating the background layer again and gaussian blur the layer. Choose enough by looking at the preview and apply it. A layer mask is then added and we use the gradient tool to select where we want focus to be and have a gradually increasing blur away from the subjects to give a less static background blur.
The final part is to make the subjects look good in the light. Green casting can be removed by using coloured filters, selective colour, colour balance and curves. All four methods are shown in the video.
We can also make the subjects radiant - we duplicate the extracted layer and run a high pass filter. To know how much to run through, we guage by using the gaussian blur function - we identify how much we need just to make the skin look smooth but not too out-of-focus, and then we take this value for our high pass filter. After the high pass, we add a gaussian blur, but roughly only a third of what we applied for the high pass. In the video I used 1.5 for the high pass, and consequently 0.5 for the gaussian. We hit Ctrl+I to invert the layer and then choose Overlap as our blending style. This gives a radiant look on the subjects, and a handy technique in hand if you want to hide some skin blemishes. I chose Overlap to accentuate the effect, but we could have quite easily used Soft Light. Using the Soft Light blending style will give a more muted effect than Overlap.
The end result we have is shown on the right with the original on the left (as always, click for larger images):

The hurriedly made video below goes through the above techniques (though I may re-record it at a later date):
I hope there are some useful processing techniques to take away, and thanks again to Palakaboy for letting us learn through his work.
Subscribe to:
Posts (Atom)