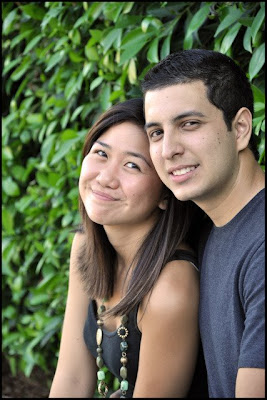
For today's entry, I've been kind enough to have been lent an image by Cameralabs Forum member, Palakaboy. It is another portrait, but unlike the one in the first tutorial we have a different set of issues. Here is his image:
The composition is solid, as is the exposure. But what we lack here is dynamic lighting and a problematic background. The DoF is quite deep so we have leaves that are competing against the subjects, and as mentioned in my outdoor portraiture entry, green backgrounds close to subjects will act as green reflectors - we have that green cast on the midtones of the skin. Both these issues we can adjust with some knowledgeable post-processing - the issue with the lighting is harder, but we'll see what we can do. Here goes:
We can use techniques to blur out the background, but we don't want to blur out the subjects. To get around this we can duplicate the background layer and extract the subjects in a separate layer. Once extracted, this will allow us to manipulate the leaves separate to the subjects.
To alter the background, gaussian blur is needed, but a common error is to make it look very artificial by having a uniform flat blur. We can conceal the editing by duplicating the background layer again and gaussian blur the layer. Choose enough by looking at the preview and apply it. A layer mask is then added and we use the gradient tool to select where we want focus to be and have a gradually increasing blur away from the subjects to give a less static background blur.
The final part is to make the subjects look good in the light. Green casting can be removed by using coloured filters, selective colour, colour balance and curves. All four methods are shown in the video.
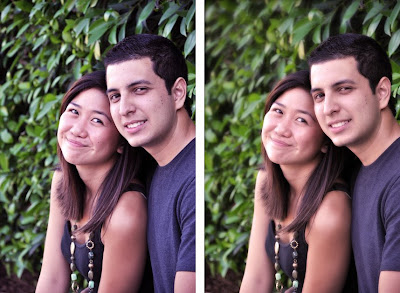
We can also make the subjects radiant - we duplicate the extracted layer and run a high pass filter. To know how much to run through, we guage by using the gaussian blur function - we identify how much we need just to make the skin look smooth but not too out-of-focus, and then we take this value for our high pass filter. After the high pass, we add a gaussian blur, but roughly only a third of what we applied for the high pass. In the video I used 1.5 for the high pass, and consequently 0.5 for the gaussian. We hit Ctrl+I to invert the layer and then choose Overlap as our blending style. This gives a radiant look on the subjects, and a handy technique in hand if you want to hide some skin blemishes. I chose Overlap to accentuate the effect, but we could have quite easily used Soft Light. Using the Soft Light blending style will give a more muted effect than Overlap.
The end result we have is shown on the right with the original on the left (as always, click for larger images):
The hurriedly made video below goes through the above techniques (though I may re-record it at a later date):
I hope there are some useful processing techniques to take away, and thanks again to Palakaboy for letting us learn through his work.
Saturday, 20 September 2008
Monday, 15 September 2008
In from the cold
Following two sessions of post-processing, I thought it might be good to have a slight change. And here we go - here's an image I took on the 14th of September 2008 from Waterloo Bridge in London. I stood in a gusty headwind (not wise with the smoke!)
More can be found on my official website: www.edtangphotography.com
Wednesday, 10 September 2008
Constructive tutorial (2) - Alastair
Following on from my last post, I've been given a request from Alastair.
"Hey Ed!
I would love it if you could give this image a bit of a critique and edit (if needs be). I'm very happy with it although not completely pleased with the tree on the right but I think overall it's a good photograph and had a particular mood to it. What do you think?"
It's a pretty landscape. This small version above doesn't quite do it justice. A larger version is available if you click on the image. What works here is a well captured sky that's filled with interest. The cloud formations as well as the distant horizon bring lots of promise to this image. It's not all good news though - we have a situation completely the opposite to the last tutorial with Thomas' image - we have too much contrast here. There is a large dynamic range between the sky and the foreground; this accounts for the dark and underexposured trees. But there's no need to despair! Underexposure is easier to correct than overexposure in post-processing, so all isn't lost. I'll talk through what we can do to rescue much of the detail in the video. The other issue we have, and Alastair has identified himself, is the composition. The trees aren't quite placed "perfectly" to be pleasing on the eye. Again we can remedy this, and I'll talk a little about some fundamentals in composition in the video.
Finally there isn't an immediately obvious focal point in this photo. The peak lies close to centre, but is marginally overexposed and blends in with the clouds; we have the dark underexposed trees in the foreground, but they don't act as leading lines into the image. I found that my eye wandered across the image. But again we can remedy this, and the other two issues mentioned:
I've used the construct of the golden mean as well as a natural frame with the dark trees and clouds. This should give more lead into the frame and not let our eyes wander far off. What we've framed is that peak and all the depth behind it. We've also reclaimed a bit of the foreground and added even more drama to an exciting sky.
Here's the video (in two parts) that talks you through my analysis and what I've done.
Once again, this is only my interpretation of how the image should be. I hope I've explained the concepts behind what I've done and if there are questions, please post them in the comments section at the end of this.
I'll finish off with a little in-camera technique. I haven't a clue how Alastair focused for this image - if it were focused at infinity at the peak, that wouldn't be unexpected. However if you're exploring great DoF whilst retaining sharpness, there is the hyperfocal method. You focus one third of the way into the frame using a small aperture, f/11-16. This is because DoF extends two thirds beyond the point of focus. This should achieve a greater DoF and sharper image than just focusing at infinity.
Many thanks to Alastair for providing us with a great image to learn from.
Tuesday, 9 September 2008
Constructive tutorial (1) - "thomasrichards"
I was fortunate enough to have been invited to take a look and apply some constructive pointers to work produced by "thomasrichards", a member on the Cameralabs forum (see here).
Here is one of the two images he submitted in that forum:
"This image doesn't quite do it for me. One problem is that your model has been unflatteringly framed with too much space around her in the wrong places. There is a large space above her that takes a little focus away; yet it's understandable to keep background in as it's an outdoor portrait - you need that context. A little crop is needed. The tilted perspective does work well though (see here for my post on tilting) - other good things worth mentioning are the exposure, DoF, focus and the white balance.
The second issue is bigger and that's the lighting. There is a green tint caused by your surroundings (see my post on outdoor portraits here). In essence the trees act as giant green reflectors. But green tint aside, there isn't enough contrast in lighting between the model and the background; it lacks punch. So here are some pointers that you could try in post-processing:
I'll repost a precis of what I originally wrote:
The second issue is bigger and that's the lighting. There is a green tint caused by your surroundings (see my post on outdoor portraits here). In essence the trees act as giant green reflectors. But green tint aside, there isn't enough contrast in lighting between the model and the background; it lacks punch. So here are some pointers that you could try in post-processing:
- Cropping to a 4:3 ratio to get more width and reduce the height. The width gets the most out of the background with the converging lines (and it's an outdoor portrait, so we can't crop out all the background).
- Increase contrast between model and background by using several techinques that included the use of layer masks with brightness increase, contrast decreases and increases, levels adjustment, altered channels, high pass filters, warming filter, and diffuse glow."
This edit is my interpretation of what I thought would maximise the impact of the portrait.
It appeared to be a popular edit and I've been inundated with requests on what I actually did. Rather than just telling you how, below is a short video that will go through all the steps I went through to obtain that end result.
The editing was done with Adobe Photoshop CS3 on an underpowered Asus Eee 901. You'll see the embarrassing "low disk space" warning during the clip. The resolution and volume also aren't impressive. However I hope it's clear enough what I've done and how you could do the same.
- a little oops. I just watched my video in completion and realised I'd forgotten to add a warming filter. The standard warming filter (86) at 11% is what I added to the edit I've posted above. This is a step missing at the end of the video. Also missing is a step I use when prepping an image for printing - sharpening it. I favour a method of duplicating the background layer and then placing a high pass filter - give it just enough so that you can faintly see the major outlines of the image under the grey - then overlay that layer over the background. If I have another chance to make a video tutorial again, I'll make sure I go through these.
Of course this is my interpretation on what I thought the image ought to look like. There may be differences in opinion, but this is photography!
Many thanks are owed to Thomas for kindly letting me use his image for this post.
NB: If there is a demand, I'd be happy to do a few more posts of this nature. All I ask is that if you are willing to submit an image for constructive criticism (and possible editing), please leave a link to your image in the comments section to this post.
Monday, 8 September 2008
More on Photojournalism (the "grab and go")
I wrote a brief introduction to the world of photojournalism a while ago (it can be found here). I'm going to follow it up further with a description of the handiest bag one can have in the profession. It's the bag that you can literally "grab and go". It's fondly known by other names, but I tend to call it a "grab and go".
It essentially is what I call it; a bag that's ready to be taken at the very last moment for an assignment that's been given at very short notice. Let's make a list of what's in this bag:
- Number 1: I lie. It's more than one bag. Make it two or three. Organise it so that you're not carrying two of the same type of bag. A rucksack and a rolling suitcase might just do. The suitcase is most handy for flights, and the rucksack for the unknown or emergencies. In essence with breaking news, a PJ doesn't really know their sleeping plans. The main aim is to cover the event. The rucksack keeps everything compact and on the go without the need to trawl a suitcase for instance.
- Back to the contents of the bag: it should contain some basic clothes for two days, a rudimentary personal kit, a hand/bath towel, a spare pair of shoes and crisis kit.
- The personal kit should include a toothbrush, toothpaste, pack of travel tissues, hand wipes/alcohol gel, deodorant, a bar of soap, comb, hand mirror, a disposable razor and a travel sewing kit. You might decide to add a few common medications in case of illness, such as simple analgesia (paracetamol/acetaminophen), anti-histamines (in case of allergies) or a mild painkiller (ibuprofen). There's always a risk with insects when travelling abroad, so the rolling case usually carries a form of insect repellent.
- The crisis kit is really a mix of essential and excessive elements to the "grab and go". Some simple sugary snack should be included. A pack of sweets or a small jar of honey will do. This can be mixed in with warm water for a shot of energy. Likewise sachets of instant coffee/hot chocolate. Additional food can be stored in tin cans - usually 2 or 3 will do. Bottled water is a must and pack as much without weighing down the bag (~2/3L). A compact first aid kit that's been checked for the contents (often it may get used in the field and isn't replenished as an oversight); travel power adaptors (plus power cable for the phone - a laptop is a luxury in this bag [more often found in the camera bag], but if you can bring one along with a charger, then do), spare AA/AAA batteries which can be used in common appliances; torch, compact wind-up radio, handheld TV, alarm clock, notepad, writing utensils, string/rope, duct/electrical tape, bin bags, penknife (with can opener), raincoat, emergency thermal pack.
- A pack of cigarettes. Awesome item to have for trading.
- Along the way to the airport make sure to have a chance at purchasing a map for your destination. If it's a national event you're heading to, a local map should be somewhere within the "grab and go".
And then there's the camera bag...I'll save that for another time.
Subscribe to:
Posts (Atom)